Friday 31 March 2017

Block 6: NQC Quilt Block Challenge


Week 6! Yay!

That means we're two thirds done.


Block 4
Block 5
Block 6
Block 1
Block 2
Block 3

Again this week it was the Christmas version of the block that was giving me trouble.

Despite accurate cutting, and then pinning before I sewed I ended up with one row that was so far out that I had no choice but to rip the stitching and re-do it. I think it must have had something to do with all the bias edges.


It started off only out by about 1-2mm (right edge in pic above) but somehow by the time I'd finished joining those rows the points and left edge were almost a full cm out of whack.

Thankfully after I ripped out the seam, re-pinned and re-sewed it came together much better.


Block 4
Block 5
Block 6
Block 1
Block 2
Block 3


Until next time

K

Wednesday 29 March 2017

Week 13 - Goblin King: Labyrinth Quilt and Stitch Along

"I have sworn with my life's blood, none shall pass this way without my permission!" 


I'm not sure how I feel about Sir Didymus; on one hand he's adorable and heroic but on the other he's irritating as all heck! I guess the same could be said about most terriers I know.

Sir Didymus is of course this week's feature in the Fandom in Stitches Goblin King: Labyrinth Quilt and Stitch Along. He's also another of my very own embroidery designs.

As always there is a paper pieced or embroidery pattern to choose from. This week the paper pieced pattern was again designed by Angela Gross. Both patterns are available to download now from Fandom in Stitches.

The design on this week's embroidery pattern came together quite quickly, unfortunately I can't say the same for the actual stitching. They came together in the end, but it felt like it took forever to stitch my two samples of this design.

The mono version on lilac fabric turned out OK, although I made a tiny alteration to the design around his shoulder after stitching this piece.

Week 13: Sir Didymus - mono version
Embroidery pattern by me (stitched by me)
for the Goblin King: Labyrinth Quilt and Stitch Along

I found that my colour version on white fabric did not have enough colour using just the outline. I ended up varying the stitches on some parts, using stem stitch and multiple rows of chain stitches to get some more definition and colour into the work.

Looking at him now as I'm writing this, I think I might put this piece back in the hoop and add more brown/orange to his tail and whiskers - the thread colour I used for those is just a bit too close to white for my liking.

Week 13: Sir Didymus - colour version
Embroidery pattern by me (stitched by me)
for the Goblin King: Labyrinth Quilt and Stitch Along

We're getting closer and closer to the end of this project now. I'll be sad to see the end of it because I've been having so much fun over the last few months designing, stitching and writing. I'll have to start thinking abut what the next project might be.


Until next time.

K

Saturday 25 March 2017

Block 5: NQC Quilt Block Challenge


Five weeks in and I've stuck with it so far so I might yet get these quilts finished. I'm looking forward to that day!

As usual I've done both a neutral and a xmas version of this week's block.

The blue, grey and yellow version turned out really nicely.


Block 4
Block 5

Block 1
Block 2
Block 3

The xmas version of this week's block looks a little different - I mucked up the centre colours (it was supposed to be green and black). I've decided I like how this variation turned out though so I'm not going to bother re-doing it.


Block 4
Block 5

Block 1
Block 2
Block 3

Four (eight) more to go! getting closer.

Until next time

K

Recap: Weeks 1 - 12 - Goblin King: Labyrinth Quilt and Stitch Along

I've now posted about 12 weeks of the Goblin King: Labyrinth Quilt and Stitch Along so its time for a quick recap.

So far we have done:


Here's my virtual design walls showing the embroidery blocks so far. 
(note that the actual block sizes vary - it's just convenient for the purpose of this collage to have all the pictures display at the same size)

Goblin King: Labyrinth Quilt and Stitch Along
Weeks 1-12 embroidered blocks (colour version)
Various designers - stitched by me

Goblin King: Labyrinth Quilt and Stitch Along
Weeks 1-12 embroidered blocks (mono version)
Various designers - stitched by me

So many characters done, but still so many left. Have we done your favourite Labyrinth character yet? 

Wednesday 22 March 2017

Week 12 - Goblin King: Labyrinth Quilt and Stitch Along

"Hey, lady! It's against the rules to throwing other people's heads!"
"Yo! You're only allowed to throw your own head!"


We're continuing the journey through the Labyrinth today with the week 12 and another set of patterns for the Fandom in Stitches Quilt and Stitch Along.

This week it's time to Chilly Down with the Fire Gang! How much fun are the Fireys? I mean how cool would it be to be able to light a fire with your finger or play soccer with your mates head? Love these guys so much!


The paper-pieced pattern for this week's 9 inch block was created by one of my favourite fandom designers Angela Gross, and tested by Jo Minvielle; while the embroidery design was created by Mel Moore and tested by me.

Both versions of this week's block are available now over on Fandom in Stitches.

Check out my embroidery versions below.

Week 12: Fireys colour version (stitched by me)
Embroidery pattern by Mel Moore
for the Goblin King: Labyrinth Quilt and Stitch Along

Week 12: Fireys mono version (stitched by me)
Embroidery pattern by Mel Moore
for the Goblin King: Labyrinth Quilt and Stitch Along

Hope you enjoy the Fireys as much as me.

K


Friday 17 March 2017

Happy St. Patrick's Day!

Just taking a little moment to share some St Patrick's Day cheer.

Wishing you a rainbow
For sunlight after showers—
Miles and miles of Irish smiles
For golden happy hours—
Shamrocks at your doorway
For luck and laughter too,
And a host of friends that never ends
Each day your whole life through!

Lucky Shamrock - Pattern by Trillium Design, sewn by me
Free pattern download from Craftsy

Block 4: NQC Quilt Block Challenge

Week 4 of the NQC Quilt Block Challenge is here.

I cheated a bit this week. I had a few days off works sick so took the opportunity when I wasn't resting or coughing to work on the blocks before the official pattern was released in the early hours of this morning.

Not sure I'm a fan of releasing the pattern pics and colouring/planner pages right from the start. With the blocks being as simple as they are, its really not that hard to skip ahead. To me it feels like its defeating the idea of a quilt along. I kind of miss the anticipation of waiting for the next pattern to be released, not knowing whether I should be excited or full of dread.

Anyway, this weeks pattern is now released and my blocks are done. I'm still amazed at how different fabrics can make the blocks look entirely unique.

Block 4


Block 1
Block 2
Block 3

Block 4


Block 1
Block 2
Block 3

Four (eight) blocks down, only five (ten) blocks left to make until I can put the quilt tops together.

K

Wednesday 15 March 2017

Week 11 - Goblin King: Labyrinth Quilt and Stitch Along

"Sarah friend"


The gentle giant of the Labyrinth, Ludo is another of my favourites (in case you haven't already worked it out - most of the characters are my favourites - I love this movie!).

And of course Ludo is this week's character in the Fandom in Stitches Quilt and Sew Along!

The paper pieced pattern for this week has been designed by Kylie Pecarina, and the embroidery pattern by yours truly. Both patterns are available to download now from Fandom in Stitches.

The embroidery pattern is also available on My Patterns page.

I'm grateful to Nina Riggle for testing this embroidery pattern for me. Her questions and feedback resulted in some changes to the original design that I think have improved it greatly.

Week 11: Ludo - colour version (stitched by Nina Riggle)
Embroidery pattern by me
for the Goblin King: Labyrinth Quilt and Stitch Along

Week 11: Ludo - mono version (stitched by me)
Embroidery pattern by me
for the Goblin King: Labyrinth Quilt and Stitch Along

We're getting closer to the end of the Labyrinth with each passing week. Which character will we see next?

K

Tuesday 14 March 2017

Last minute gift: Naruto Cloud Cushion

I've been feeling less than average over the last few days, I've picked up a yucky bug of some sort. I'm sure it's nothing that rest, fluids and lots of vitamin C won't fix but I've spent a lot of time over the last few days in bed or on the couch feeling congested and sorry for myself.

Naturally I wasn't particularly impressed when the monster, in a panic, mentioned that her best friend's birthday was only a couple of days away, she wanted to give her a gift, but didn't have anything chosen or ready.

I consider the local shopping centre to be a soul-sucking, wallet-draining, evil place at the best of times, so I was definitely not feeling like heading out for a teen shopping trip, especially not a 'wander around for hours until we find the perfect gift' trip. Even on a good day my strategy is to get in and out of that place as fast as I possibly can!

So with a shopping trip out, and time running out that left making something...but it needed to be easy and fast. Something that either I could get done quickly with my limited ability to focus at the moment, or something the monster could make herself. In the end it was a bit of both.

Cushions made as Christmas gifts
I made a couple of cushions as Christmas gifts this year. One cushion in particular my anime-obsessed monster fell in love with - a Naruto Cloud cushion that I was making for my sister-in-law. The monster loved it so much that I ended up making two at once so that she could have her own (it also gave me the chance to try out satin stitch edging vs raw-edge on that particular gift).

Akatsuki robes - Inspiration for the Naruto Cloud cushion.
The monster's friend is just as anime obsessed as she is, and seeing as I already had a pattern template for the cloud component it seemed like it might just fit the bill. With a decision made it was a simple matter of getting the monster to cut out the pattern components and then me putting it all together in a simple envelope cushion cover.

I was hoping to be able to use only stuff from my stash for this one (still in not wanting to leave the house mode) but I've been using a lot of black quilting cotton lately so didn't have quite enough, and I needed a cushion insert... so off to spotlight we went.

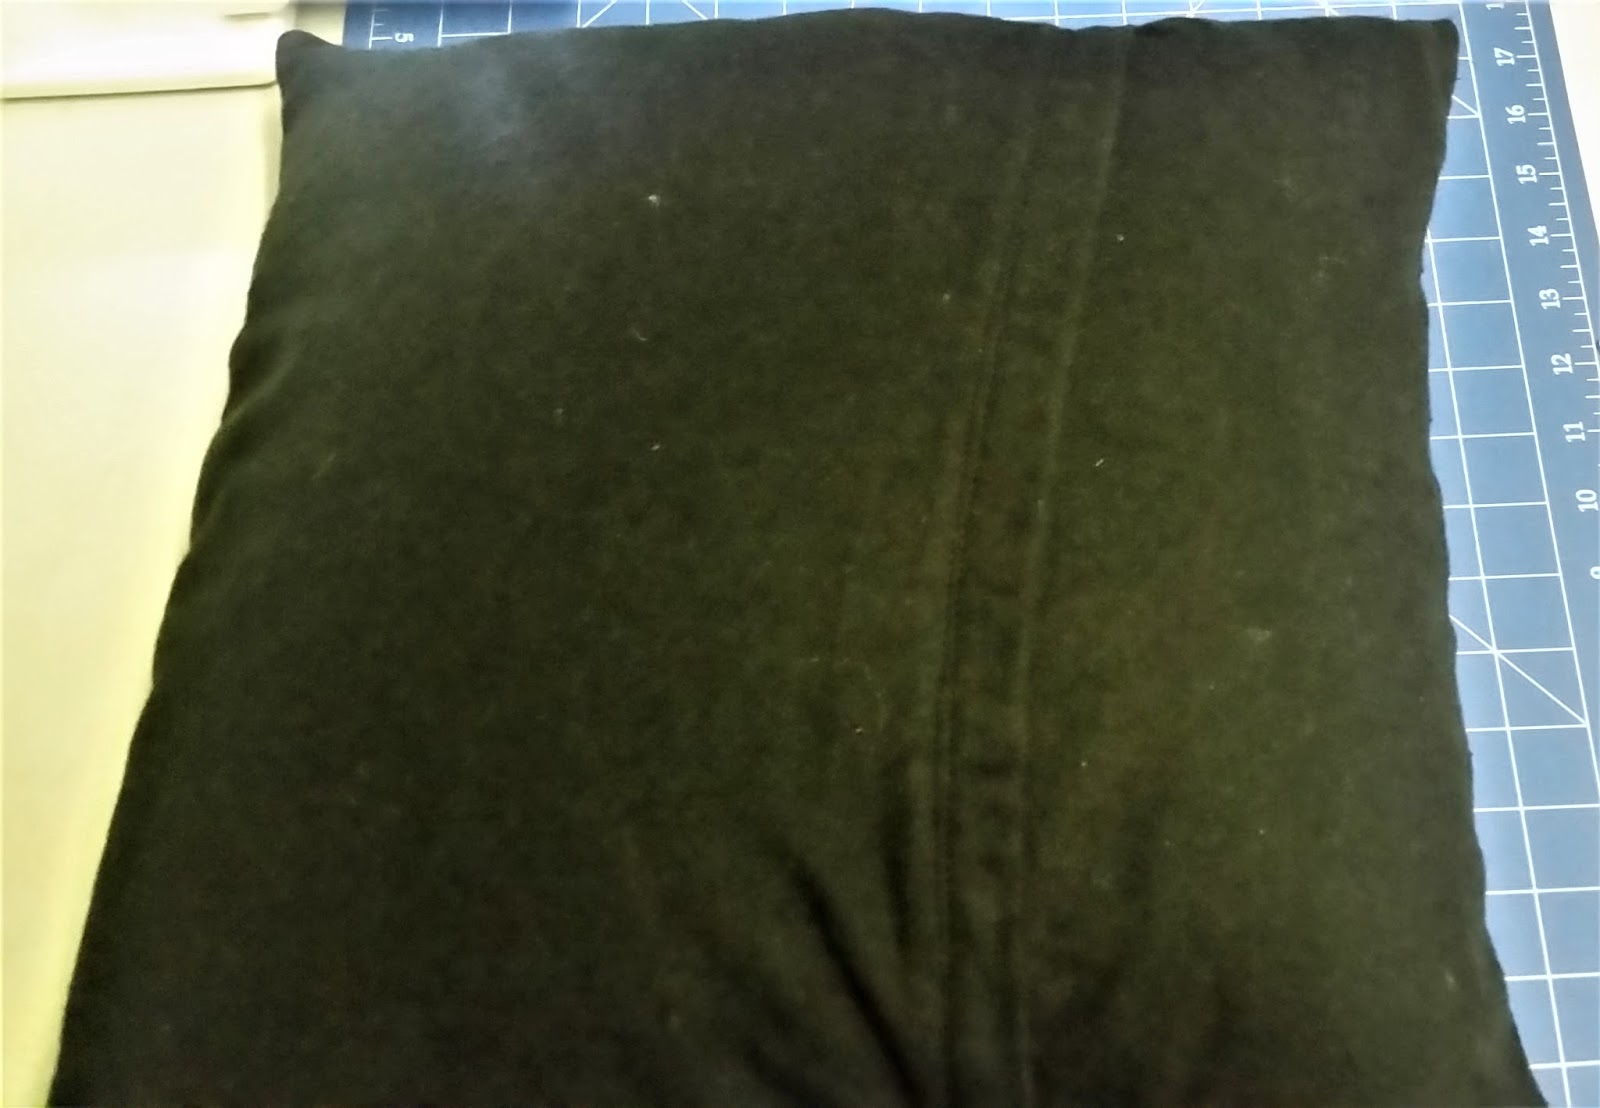
The monster chose a black flannel rather than quilting cotton for the actual cushion cover fabric. A great choice as it is a nice deep black, and feels suitably soft and cuddly. But boy is it a pain to sew with - fluff everywhere and the fabric sticking to itself rather than sliding making lining up seams and adjusting things painful but we got there in the end.

Naruto Cloud Cushion
Envelope closure on back of cushion
All up it took just over an hour to put this together, from cutting out the applique pattern template, top-stitching the cloud in both red and white right through to assembling the envelope cushion cover.

I didn't get a chance to run the cushion cover through the wash as I normally would, so I've packed up a colour catcher sheet and instructions with the cushion and the recipient can use that whenever they wash the cover themselves.

I sure hope the monster's friend likes the gift and gets lots of use from it.

And now I'm heading back to bed.

K


Monday 13 March 2017

Half Square Triangles (HST) - trying a couple of methods

After realising that a lot of my personal challenge with the traditional blocks in the NQC Quilt Block Challenge was to do with the volume and monotony of the precision trimming involved, I went in search of easier ways.

And where do I go for help with most things crafty? Pinterest of course!

I came across a blog post / tutorial that reduces the amount of trimming on each HST piece from four trimming cuts to just two. With up to 16 HST pieces per block, that's going from up to 64 individual trim cuts, to 32. Definitely worth a try.

The normal method - recommended in the early instructions for the Challenge

  1. Lay two contrasting squares of fabric on top of each other, right sides together.
  2. Draw a diagonal line from corner to corner to corner.
  3. Stitch a scant 1/4 inch either side of the drawn line
  4. Cut on drawn line, between the 2 lines of stitching.
  5. Press open and trim.
Press the unfinished square open and line up the diagonal
on the ruler with the diagonal on the piece.
Trim all four sides.
Result = perfect HST piece

The 2-cut method

Follow steps 1-4 above, but from there the method changes.

The idea is that instead of pressing them open and then trimming all four sides you line up the diagonal line of the ruler with the stitching line, trim the two raw edges and then press them open.

Makes sense - its completely logical, there's no reason why it shouldn't result in perfect Half Square Triangles... except it didn't!
Diagonal on ruler lined up on stitching line
Ready to trim two sides only

The finished piece after pressing the 2-cut HST open

In addition to having little tails on the corners that still need to be trimmed off before stitching, somehow the finished piece did not end up square.

I still don't know how that happened! I was so careful to line up the ruler correctly, and I made sure it didn't move while cutting, but the finished piece speaks for itself.

The verdict

I have a hard enough time matching points and having block turn out the correct size without adding mis-sized and mis-shaped pieces into the mix.

It might take a little bit longer, but I'm resigned to sticking with the normal / 4-cut method.

I did come up with a little bit of a time and sanity saver though. I was in Spotlight the other day picking up some fabric for a last-minute gift (post about that coming soon) and I came across the cutest little cutting mat.

My new mini cutting mat 

The mini mat is 6x8 inches so it fits the unfinished HST pieces for the Challenge quilt nicely, but it's small enough to be able to spin around really easy on the bench without needing to shuffle around the sewing machine and all the other assorted bits and pieces I have surrounding me when I sew. (My larger cutting mats fit nicely in the available space with little room to spare - spinning them around mid-piece is just not an option.)

Now I don't have to reset my fabric and ruler each time I need to rotate it to trim each side of the HST piece, I just spin the whole cutting mat.

So after all that - a pinterest fail, but a semi-win with a practical new tool.


K